Lucky School of Quilting Techniques
By Susan (Lucky) Shie
Note in April, 2007: In my classes, I used to teach what I call the "Lucky School of Quilting Techniques," which are some of the very radical methods I cooked up on my own for hand sewing and embellishing art quilts, as well as my own way to sandwich a quilt. I learned the proper ways of sewing in 4-H, Home Ec, and especially from my mom. But I developed these techniques from an artist's point of view, in order to facilitate what I wanted to do with my strange quilts. I have figured out each technique as needed, and taught them for many years. They are becoming mainstream art quilting processes now, as my students go out and use them, as well as teaching them to their own students.
I no longer teach these processes, but instead teach the processes I'm more focused on now, mainly making art quilts which are mostly painted and written on, as diary stories, with no emphasis on the simple machine sewing I do. But I am leaving the Lucky School of Quilting techniques here for you, as an archive of what I used to do, in case you want to fool around with it. Fooling around is the best way to work, as long as you take fooling around very seriously. So here goes:
Sandwiching to start, finishing the edges first:
I start by making the sandwich (a Lucky Sandwich!) of two fabrics, right sides out, with batting between. There are two ways I can build this sandwich:
If you want the front and back fabrics to be flush, with no border, then make your batting be the template you work from. Cut out a square or rectangle of batting. I use Polyfil Traditional, because my big fat needle and floss glide through it well and I like the thickness, that of a thin blanket. High loft and low loft are different thicknesses from Traditional, which is the thickness I use. (I find Polyfil at Wal-Mart.) Put your first fabric right side down on the table. Lay the batting already cut out on top of this fabric, so that the two outside edges of the fabric each stick out past the batting 1/16 ", and cut the fabric so that the other two edges of it also stick out past the batting by that much. So all around, the fabric is about 1/16" bigger than the batt. Fron the bottom, fabric side, put some pins into this two-layered thing, so you can flip it over without having it slide apart. You have to be able to reach the pins from the fabric side, so be sure to put them in from the bottom, between the fabric and the table.
Now flip this whole thing over onto the second fabric, which is also lying on your table, right side down. Line it up at this fabric's outside corner, and redo the pins, so now they go through all three layers, from the top. Double dipping your pins: in and out, in and out, makes them stay in better. Use long quilting pins always in quilting! Cut the second fabric so it's flush with the other fabric all around.
 The second
way I do a sandwich start is to make a border with the backing fabric.
And for this you start with the top fabric square or rectangle or a painting
on fabric as your template for deciding how to cut the batt and the backing
fabric. You lay the already cut out top fabric piece or painting on top
of the batting and cut the batting however much larger than it, that you
want the border to be. Then pin these together and lay them on top of the
backing fabric. Now you cut the backing fabric big enough to not only come
over the batting, but tuck easily under the front fabric. You may have
the backing fabric as much as five inches bigger all round the batting,
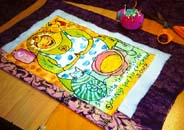
depending on the size of the border you want. In the first photo, you see
the batting and backing fabric, as they look when I'm forming a self-border
with the backing fabric. Because this quilt is made with a painting as
the front fabric, I tuck the edge of the border fabric behind the painting,
so none of the painting's surface or imagery gets covered by the backing/border
fabric. In the picture, one side of the backing has been folded up to form
a border, but all four sides will be folded in, and I make simple folded
corners, not mitered ones. You can miter if you want to! Not me!!!!
The second
way I do a sandwich start is to make a border with the backing fabric.
And for this you start with the top fabric square or rectangle or a painting
on fabric as your template for deciding how to cut the batt and the backing
fabric. You lay the already cut out top fabric piece or painting on top
of the batting and cut the batting however much larger than it, that you
want the border to be. Then pin these together and lay them on top of the
backing fabric. Now you cut the backing fabric big enough to not only come
over the batting, but tuck easily under the front fabric. You may have
the backing fabric as much as five inches bigger all round the batting,
depending on the size of the border you want. In the first photo, you see
the batting and backing fabric, as they look when I'm forming a self-border
with the backing fabric. Because this quilt is made with a painting as
the front fabric, I tuck the edge of the border fabric behind the painting,
so none of the painting's surface or imagery gets covered by the backing/border
fabric. In the picture, one side of the backing has been folded up to form
a border, but all four sides will be folded in, and I make simple folded
corners, not mitered ones. You can miter if you want to! Not me!!!!
(So remember: in the bordered method, the painting on fabric or front fabric is the template you base the size of batting and backing fabric on. And if you want the front and back to be the same size, with no border, then make the batting cut out first, to be the template for the two fabrics, but they'll be slightly larger than the batting.)
I bind the edges by hand with embroidery floss and a crewel needle, at least with a running stitch, and later an overcast stitch on the edge. Or the overcast stitch edge from the start, if you're willing to take longer to get going. The overcast stitch will then bind the edge, so you'll never see that batting again! Or, if I'm really in a hurry, I'll machine straight stitch around the sandwich, about a half inch in from the edge, with a running stitch, knowing I'll overcast the edge later. Only this is ugly. I prefer hand sewing it all! You want to somehow catch the batting in the stitch, which is about 1/16" in from the edge, so it doesn't slip around on you. If you just do an overcast edge with no running stitch, then you'll have to leave pins in, until some later sewing catches that batting. When you overcast, use 12 strands of floss, so it gives a strong feel to the edge, as well as a prettier, fuller look. However you start, by the end of this step in working on a block or piece, the edges have to be bound somehow. Either the two fabrics meet flush at the edge and the batting slightly recessed, or the backing fabric coming around to form a border around the front fabric, in which case you'll be sewing where the front fabric overlaps the border, or vice versa.
 In this photo, I am stitching around a border
that overlaps the front fabric, which is not a painting. In fact, it's
a Lunn Fabrics hand made Ripples
shibori print. Sometimes I can't decide which of the two fabrics should
really be the front, and end up having the border on back, so I can work
with the other fabric on front. In this case, the Lunn fabric is so beautiful,
I don't want to cover it up with applique, etc, so I may very well turn
it to the back. In the long time span of making the quilt, I will see a
lot of that lovely backing! And when the quilt is finished, the Lunn fabric
will show forever on the back, along with its nice and lumpy KNOTS!!
In this photo, I am stitching around a border
that overlaps the front fabric, which is not a painting. In fact, it's
a Lunn Fabrics hand made Ripples
shibori print. Sometimes I can't decide which of the two fabrics should
really be the front, and end up having the border on back, so I can work
with the other fabric on front. In this case, the Lunn fabric is so beautiful,
I don't want to cover it up with applique, etc, so I may very well turn
it to the back. In the long time span of making the quilt, I will see a
lot of that lovely backing! And when the quilt is finished, the Lunn fabric
will show forever on the back, along with its nice and lumpy KNOTS!!
The big difference here, from regular quilting, is that I create the sandwich and bind the edges right away, before any quilting, so the sandwich loses its rigid shape, its perfection, as I sew more. And I don't measure or worry about right angles, in cutting my fabrics. I do not let the batting show at the edge though. Edges are all encased. There is no need for a hoop or frame for quilting, when you have the sandwich from the start, since the batting stabilizes your sewing tension.
Applique and quilting all at once:
Next, with a bound sandwich, I either do applique or start embroidering, if the top layer was a painting. I sew all techniques through all layers of the sandwich, with embroidery floss and a crewel needle, using six or twelve strands of floss, a #2 Dritz crewel needle, and big knots, which show proudly on the back! As I applique or embroider, I'm getting a wild pattern of stitches and knots on the back. I jump around the surface, in selecting where to sew next, so I get all parts evenly stitched, so the piece doesn't bulge, and yes, I do pin things as I work!!! It's important to do a lot of stitching all over the piece, or you'll get huge puckers, where you neglected to work as much. But start with a little here, a little there, etc. I often do outline stitches first, over the whole quilt.
I work a lot with running stitch, outline or stem stitch, satin stitch, ladder stitch, and chicken stitch (a kind of random wandering running stitch in many directions, good for backgrounding.) French knots and feather stitch are other favorites, along with chain stitch. I like 'em big and irregular, so they are artsy and fun, not tight and perfectly boring! But they certainly do need good tension and strength!!!!
I have some stitching techniques which are all mine, like embroidered edge holes that go all through the sandwich and resemble the effect of shisha mirrors. I started the big embroidery stitch quilting trend, which many of my students have continued. Whenever you see quilts with the overcast edges and big stitches that go through to the back, with lots of knots, or those embroidered holes, I taught the maker. Also I emphasize that the stitches are marks made with a needle, and will have more energy and movement when irregular. I stress stitching with good tension, and being careful to not have loops of snarled floss on the back! Use your other hand to kinda feel what's going on on the back, and you can always stop sewing and take a look! Often!
These are just a few of the techniques I teach and use. I just "used my head" to dream them up. I do a lot of outline or stem stitch work over my drawings and paintings on fabric, and over my printed writing. My husband, Jimmy Acord, does machine embroidery over my cursive handwriting, also. When it's printed, I've sewn it, and the cursive is his sewing over my writing. I love to draw, paint, and write right on the fabric, with no tracing or preplanning the work. I encourage students to work with a permanent marker when drawing, and to enjoy whatever comes out, the first try!
When we teach, I emphasize trusting your creativity and not judging your imagery. I try to keep the students loosened up and remembering their six-year-old's glee in JUST DOING IT! Like drawing on a big wall with crayons! I love to paint with fabric paints, freehand, and with airbrush, swooping along, writing off the top of my head. And all the writing is spontaneous, never copied over from another diary. The quilt is always its own diary, rather than a transcription of a diary.
Embellishing - You have to wait til all the stitching's done:
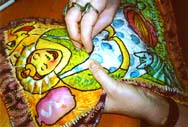 In this photo, I'm sewing bugle beads next to a line
of outline stitching, after all the quilting/embroidering is done on this
panel. Beading takes slowing down a lot, to make sure the beads are on
good and tight! I always want the work to be very strong, but I also love
just sewing any color of bead next to the last color, if it feels good!
Beading has to come after all the stitching of quilting work, since quilting
shrinks the sandwich, and makes previously sewn on beads loosen up. So
it is like a feast day, when it's beading time, finally!!!!!!!!! And larger
embellishments get sewn on after smaller ones, so less catching of the
thread occurs. Think of the build up of embellishments like a topographical
map. Do the smaller things first (after all quilting) and then build up
to the bigger embellishments!
In this photo, I'm sewing bugle beads next to a line
of outline stitching, after all the quilting/embroidering is done on this
panel. Beading takes slowing down a lot, to make sure the beads are on
good and tight! I always want the work to be very strong, but I also love
just sewing any color of bead next to the last color, if it feels good!
Beading has to come after all the stitching of quilting work, since quilting
shrinks the sandwich, and makes previously sewn on beads loosen up. So
it is like a feast day, when it's beading time, finally!!!!!!!!! And larger
embellishments get sewn on after smaller ones, so less catching of the
thread occurs. Think of the build up of embellishments like a topographical
map. Do the smaller things first (after all quilting) and then build up
to the bigger embellishments!
I use Silamide, a thread recommended to me by a student, Andi Stern, who sells it on her website, Embellishment Café. It's really strong, doesn't tangle as much as other beading threads, and comes in some nice colors, though I stick with black thread most of the time. Andi has this thread at the best price I have heard of it going for. Plus she has wonderful beads! Since she's a Lucky Quilter, she knows the kind of beads you might want for this work! Go for the silver-lined glass bugles! They make amazing outline emphasis!
I use a #10 Dritz quilting between needle for beading, unless the beads are too fine of holed, like those black bugles with colored flame flashes on them. Then I drop down to a #12 Dritz quilting between. Regular beading needles are too flimsy to sew well through all the layers of a quilt sandwich, and sooner or later they break, though they bend up right away! I find all the Dritz needles at JoAnn Fabrics, by the way.
I use my beading thread (Silamide) doubled, and I make really healthy knots both to start and to tie off. I'm careful to only sew one or possibly two bugles on at once, depending on their length. I think the really long bugles are very risky, since they are more sharp on the edges, it seems, and cut the thread more easily. Never, ever use a bead that has a broken edge! Even a little chip! Just pitch it out and don't look back! I know they're pretty and not cheap, but they'll ruin your piece! When I stitch down, I sew ahead of where I need to, out past the length of the bead, all the way through the sandwich to the back, and then push the bead back a little, and stitch up again, as close to the front of the bead as I can, so it makes a little hesitation stitch. I think this gives the thread more strength. (You're going to just have to come to class to get that explained better! That and shisha mirrors, etc, just need to be seen to be learned!)
Painting with health protection:
With painting, we use respirators if the paint is causing fumes in a room, depending on ventilation, heat, and humidity. All fabric paints and airbrush paints have to be heatset, and then we are ALWAYS very careful to ventilate and wear respirators. All the spontaneous part goes down the tubes, when I lecture about health protection. My best friend Luanne died of cancer, and I want all the students to use every safety measure they can. I also encourage everyone to clean out their paint brushes as much as possible onto fabric, rather than into the water can. Beautiful paint-filled water is really a pollution factor! The used paint rags, on the other hand, can become part of your fabric repertoire.
Sewing panels together on the work wall, and making shims:
When all the panels, or sandwiches, of a quilt in progress are finished and pinned up to the work wall, I take a long time to hand sew them all together, standing at the wall, sometimes on a ladder, sometimes on my knees, or even lying on my stomach! Having the panels pinned up allows me to use both hands to sew, using again, the #2 crewel needle and 12 strands of floss, which is just six, doubled. I use the trusty overcast stitch, sewing up, in the topmost-panel verticals, and right to left, in the horizontals just below the topmost verticals next. However, I work from the top down, overall, letting gravity define whether or not the quilt is hanging straight. If the panels start to separate, as the ones above are sewn, then I need to make "shim" panels to fit where "V" slivers of space are forming, rather than force panels together, which makes them pull out from the wall, and wreck the flatness of the quilt.
These shims are already padded and stitched with an overcast edge, already quilted, before I sew them into the quilt. What results is a funky look, with some wild shapes of patches, whose backing fabrics are all different. There are no raw edge panel seams in our quilts, since all panels are already finished on the edges, and then they get bound again with the connecting overcast stitches. You might want to use a thimble, but I prefer callouses.
Conclusion:
This gives you a glimpse of the techniques I was teaching until 2006. There are certainly more techniques, but what you've just read should get you in the mood!
I know people think I never learned how to sew properly, but I did. I took five years of 4H, did home ec, and learned the most from my mother, who was always a perfectionist seamstress. I was making Barbie clothes when I was eight years old, though I know I was fiddling with sewing way before that! I slowly evolved to making my own box pleated drapes, and my own clothes, then my husband's and Gretchen's. Later I did custom tailored leather coats for oversized bikers, in Jimmy's shop Barnfire Leather!!!!! Well, that part was Jimmy's fault, since he never refused a custom order! I had to teach him to do those leather garments himself, when I went back to college! I like making art a lot more, as there is all the room in the world to play in artmaking, once the paperwork is done for the day!!!!! And I also know how to draw realistically, but enjoy doing free and playful intuitive imagery now. Takes some letting go of ego, to know people look at the work, shake their heads sadly, and mumble that it's too bad I can't sew or draw any better than that!!!!!
Ha.
I am not teaching the techniques I've described above anymore, but I've left them here on this page, so you can play with them, if you like. As for me, I now choose to teach what I know best: drawing, painting and writing in a very intuitive and loose style, without too much premeditation or judgement to freeze it up. You can figure out the fancy stitching and beading on your own, or with other teachers. I'm the one to come to to learn to really express yourself in your own, inimitable way!
See ya. Susan, April 27, 2007
Turtle Moon Studios
Susan Shie and James Acord
| Home | | Classes | | Gallery | | Green Quilts | |Links |
| Resume | | Stuff to Buy | |Turtle Trax Diary |
| Visit Jimmy's Leather Studio

![]()
Web site design © Susan Shie and Jan Cabral 1997. All subsequent web site work, ©Susan Shie 1997 - 2007.
This page created by Susan Shie, April 27, 2007.
Web site hosting by Key to the Web, Ltd. ©2007.