 Turtle Trax
Diary for March 28, 2001. Page #31
Winter Adventures in Beautiful Ohio!
by Lucky Magnolia (Susan Shie)
Page Two
Return to Page One of this diary entry.
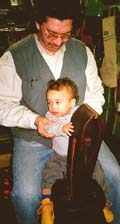 Omari is a year old now. In this photo in February, he was finally
able to wear the little deerskin moccasins Jimmy had made and given to
Aimee for him, as a birthing present. I think he's outgrown them now! And
he's walking, of course! Hard to believe a whole year has gone by, since
our niece Aimee gave birth. She's over half done with nursing school now,
too! We're very proud of her! Don't see much of her and Omari, with her
and our busy schedules, but when we do see them, it's great fun.
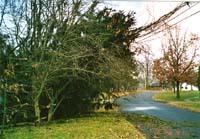 On Feb 9, around 11 pm, we heard a big crash
in our ravine. It had been a terribly windy day, one of those where, when
you go outside, it just sounds creepy! And inside ain't too reassuring,
either! And it had also been raining hard all evening. The crash sound
had been in two parts, about three seconds apart, so we thought a big tree
had fallen slowly, maybe catching in another tree for a couple of seconds.
The boys took flashlights outside, but couldn't find which tree had fallen
down.
In the morning, we found the damage: in the side ravine, between us and the neighbors to our north, a huge pine on their side of the ravine had fallen down, but had bowled down many trees on our side, on its way down! In those three seconds, a ton...OK, many tons of damage had been done! And the whole heap was resting on one of our little apple trees. They couldn't fall to the ground, and were just balancing there on the victim tree!
A week later the neighbors paid for a tree service to clean up the mess! We are so thankful to them, for being so responsible. We paid the tree guys more, to have them chop the tree trunks into managable size, for the hardwoods only, so we can make firewood from them. We also got a huge pile of tree shreddings for mulch around our trees. The ravine is much more open now, and we're thinking of planting new trees to increase the habitat again. In fact, our Feb. campers surprised us with donations toward our new trees, as a generous gift!
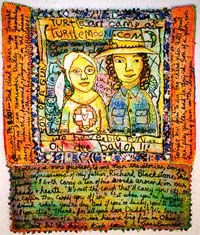 We belong to a national art quilters' group called
Art Quilt Network, and their competition for the group's next suitcase
show inspired this piece. We already had the painting made, with us surrounded
by a little "ad" for our art camps. The show theme is "Quote/Unquote,"
and this piece made sense to continue to work on, since the quote, "Son
of a gun, we have'a big fun on dee bayoh!" was written on the painting.
It was one of my dad's favorite songs! Dad's anniversary of death was happening,
so I did a long written string of Dad quotes on fabric, and we used that
as the "borders" that would bring the little painting out to
the regulation size for entry in the show. It's 24"h x 20"w.
You wouldn't believe how hard it is to estimate shrinkage of a quilt, when
you start out by finishing the edges and you want an exact size!
Anyhow, the process of writing down some Dadisms made me feel really good on his sad day. I recommend this journalling of a loved one's personality to anyone faced with a first anniversary of their being gone. Or second or third....
Although I keep saying I'm going to paint more and sew less, this little piece got really caked with stitches, which is something that keeps happening lately! We were just gonna do some outlines and a few textures, but man, you sit in a motel room for a bunch of nights, away from home, teaching, and just see what happens!
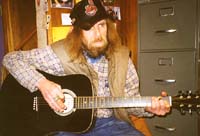 For
a combination birthday and belated Christmas present, we got our housemate
Floyd Kerr a new guitar on January 27th. He used to play a lot, but hasn't
for a long time. Now he can jam with friends, when we have our Needle's
Eye reunions or when Gretchen and Mike come home to visit. I used to play,
too, but am so rusty, it isn't even funny. And I was never that good to
begin with! Never could get those bar chords. Oh well. I can sing still!
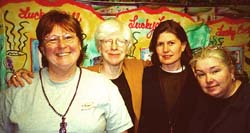 Here I am with our Feb 21 - 27 Turtle Art Camp
students: Jill Ruspi, from Laytonsville, MD, and Evelyn Albers and Diane
Huff, from across the street from each other in Treemont, (Cleveland) OH.
We were celebrating Mardi Gras together, since it was the last day of our
camp, and you can see Jill sporting her Mardi Gras purple lobster beads!
We were in the mood! At camp, we look for any excuse we can dig up to have
a party!
 We started airbrushing fairly early in this
camp, since Jill was very psyched to learn airbrush. Her husband had bought
her an airbrush, and she wanted Jimmy to teach her how to use it, before
she tried handling it on her own. Here are my four panels of airbrush,
done over what had been a stack of four paintings on top of each other,
when I'd been demo-ing Deka Permanent Fabric Paint, the same morning. Since
the fabric was very thin, the Deka paint had seeped down through the layers.
Still, with #3 and 4, I could hardly see the paint clues, to go by to airbrush
over them. Most of the imagery really came from the airbrush.
 Later that week, I sandwiched one of these to become a quilt.
I haven't had much time to work on it yet, in terms of hand quilting, embellishing,
etc. But this coming weekend I'll be sitting in meetings all day, at Art
Quilt Network, and this is the piece I intend to be sewing on, so I don't
konk out. I've always found that, if I have handwork, I can stay very alert
during discussions, etc, even slide shows! Otherwise, I start to nod and
drift off. Something about the hand sewing holds me in an alert state of
mind, and I function very well. In slide shows, you have to sit near the
front, so the reflected light from the screen helps you see enough to sew,
and you want to have mostly edge work for that! Detail sewing is too hard
in dim light!
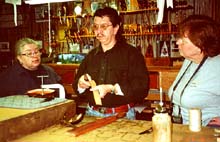 Jimmy gave a few demos of leather working to
this Turtle Art Camp group, including some basic explanations of his hand
sewing with an awl and two needles, and how he puts his cases together.
Like usual, these girls were swooning over how orderly Jimmy's studio is,
with all his tools put in their perfect places. I know I feel like I wish
I could keep my studio that neat! I would have more space, if I would take
the time to pitch unused stuff and organize better. I think Jimmy's a great
example for us all!

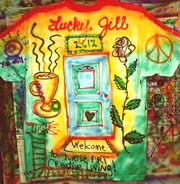 In this camp we worked very hard on the tee shirt
project. We had quite a fancy little edition, when we were done! I had
challenged the students, by showing them the last few camps' shirts, and
I think they kept up with the Jones well, in response!
Do you remember how this project goes? Everyone brings a washed white tee shirt to camp. We pin them all up, and I break the ice by airbrushing something onto my shirt. Then I have to repeat it on all the other shirts. Then a student puts an image on her shirt, and has to add the same image, as close as possible, at the same place on all the rest of the shirts, too. And so on. We start on the fronts. When we have the fronts all caked up, we flip all the shirts over, and someone starts the backs. As long as you always start with your own shirt, it's not so bad. If you mess up on the first one, it's just on your own shirt! And by the time we're done with the shirts, everyone feels pretty good with airbrushing and troubleshooting the airbrush, keeping it cleaned and unclogged.
Cleanup and heatsetting are important things to learn about airbrush, too, and everyone gets their share of that stuff! You have to wear a respirator when you heat set, even if you refuse to wear more than a gauze mask for airbrushing. Now, this camp was very, very good about everyone wearing the respirators every time they used the airbrush! I am proud of these students, who also cleaned up after their airbrush usage really well.
I adore this project. I think we should have a show sometime, in which I exhibit all my own camp tee shirts! I have an incrdible stack of them now!!!!!
And by the way, in camp we do as much airbrush as the students want. The tee shirt project is just part of it. Students can create finished paintings for making into quilts, or for just being paintings, also. the tee shirt project is just a nice, playful way to break the airbrush ice. Several very nice airbrushed paintings came out of this class.
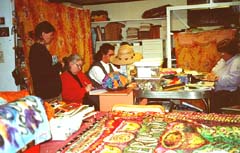 Jimmy was demonstrating his machine free motion
sewing over my cursive writing here. Evelyn and Diane were watching, Jill
was sewing at her table, and I was inspecting our piece for Quilt National,
which has to go back soon, for the exhibition. I hadn't gotten it out before
camp, to inspect it, since its return from the photo session at The Dairy
Barn. I hate to "requisition" artwork when it comes home. But
you really need to do that. I have to clear off my big table to do it,
and lay the quilt out. Once I get up the time and energy to this inspection,
I love seeing the pieces again! And of course, it was nice to have something
big to show the students.
In this case, it was "The Cookbook / Hierophant: Card #5 in The Kitchen Tarot." I loved showing them how you can lift up the central panel and find another full painting under it. We were laughing about how people will hopefully try to sneak peeks at this, when it's in galleries. I love to tempt people to touch the work...as long as their hands are VERY clean!
And I do love opening the quilts, and greeting them like old friends. I just hate having to clear off that big space and do the packing and unpacking!
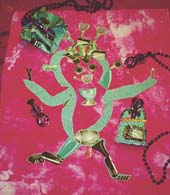 Every camp, we go shopping and I pick out a
challenge fabric for use that week. The students have to use a little bit
of it visibly on the front of a piece, during the camp. I try to pick something
unusual and truly wonderful! So we went to JoAnn's, and I found a really
cool kitchen print, kinda 50s looking. It had old toasters and other 50s
style kitchen stuff on it, on a nice 50s turquoise background, which made
most of us happy. But Jill had a totally negative reaction to it. She thought
I was kidding, to get THAT print. Or that I was trying to punish them!
I really did love the print though!
Somehow she finally decided she would use it, and got very busy, using some fusible web she'd brought with her to class. (I'm not a fuser, since that stuff is so hard to hand sew through.) She had brought along the background fabric in the block above, a pink piece she'd dyed herself. She cut the Evil Toaster print all up, and even had to ask for a little more of it, and created the spunky little man you see above! She's gifted me with this creation, since she still doesn't like the print! You'll see her Mardi Gras beads sitting on the photo, too!
 Now Evelyn and Diane liked the print with the
toasters, and they made nice projects with it, but I felt Jill had really
outdone herself with her very imaginative little Man block! Then I found
out that no one really wanted my fabulous prize for winning the challenge!
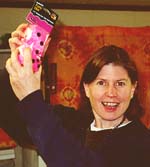
I'd found bright pink fuzzy dice to hang from your rearview mirror! Diane
and Jill both told me they wanted Evelyn to win them, so she could hang
them in her new pickup truck! I didn't quite have to pay Evelyn to look
this happy in the picture, but it WAS staged! I guess I'm the only one
of us who saw the magic in those dice! And I don't even drive! Last time
I checked, Evelyn hasn't installed them yet!
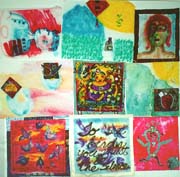 At the very end of our camps now, we have a
project that's become as integral to the class as the tee shirt project
is. We take all the art made that week (except the tee shirts) to a room
with a big empty work wall. I tell the students to work together to create
a group quilt construction, by arranging all the art on the wall, as if
they have to sew it all together. I leave the room and let them work as
a team, deciding on best composition, color balance, etc. I remind them
to make the pieces fit as well as they can, since gaps would have to be
filled by making "shims."
After they settle on their design for this fake quilt ("fake" because we're going to take it all apart, right after this exercise), I explain how I use a ladder, and for the last two weeks of making a piece, work a little each day, to sew the panels together. I show the students how to hold the fabrics and sew the verticals, from the top of the quilt, working your way down, and the hrizontals, coming down slowly, so that you see where the panels pull apart, from not fitting exactly. You can't pull them together, or the quilt won't lay flat, and you'd actually see it pucker out, since it's hanging on the wall. Having it hang while you sew it makes it easy to see how the panels are doing, and also gives you freedom to use both hands for sewing, since you don't have to hold the quilt panels so much.
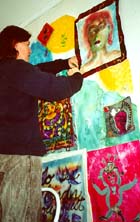 So, here's Evelyn sewing the vertical seam overcast
stitching. We use white crochet thread for this temporary sewing, so we
can really see what we're doing. But if it were a real quilt, really being
sewn up, we'd use 12 strands of embroidery floss, in a color that shows
up on the panels it's being used to put together.
One more thing: within the vertical panel at the top, you sew up from the bottom of that uppermost panel, so that your thread all falls below your hands and needle. If you sew down, the thread really gets in your way. When the panels are sewn, since they had finished edges before this process began, they now have incredibly finished edges, with three different sewings coming together at each seam! The panels don't really overlap, but the overcast stitching brings them together very tightly.
Each student has to do enough of this practice stitching to convince me that they've learned enough to be able to remember it, when they're working alone at home later!
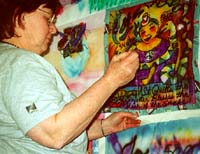 After I demonstrate the vertical stitching
and everyone's got that figured out, we move on to the horizontal seam
sewing. It's the same overcast stitch, but you hold your hands differently
for sideways work. And doing it is so much more educational than just being
told. I used to have students call or email me, asking me how it's done,
since I had only told them about it in camp. Now I think they get it right
the first time! It isn't hard. It's just doing it that's way easier than
figuring it out from just words.
Here Jill's working on the horizontal work. She's sewing my quilt-in-progress of St. Q Blesses the Year of the Snake (backed with our toaster challenge fabric) to Diane's airbrushed painting of the birds and her poem about them.
I love this project! It gives the camp a sense of closure, as well as educating everyone on how to put panels together to build a larger piece, and it makes us all look more carefully at each other's work. We see in one big connected image, all that we did, individually, during our time together!
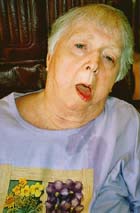 Here's my sweet Mom, in her Springy new tee
shirt, with her new short haircut. She's definitely the role model for
St. Quilta the Comforter! I get calmed just being near her, or looking
at pictures of her. She's been on a plateau for a while now, with her Alzheimer's
deterioration, though her assisted walking, with two nurses and a walker,
has improved. They exercise her daily, and one day she walked all the way
from her wing to the chapel at West View, a long hike down several hallways.
They say she's much more alert during these walks, smiling and wanting
to just GO! When I'm there to witness this exercise period, I am the one
who brings up the rear with her wheelchair, for when her energy gives out,
and she's suddenly ready to plop down! Seeing her up and walking takes
me back to the early nursing home years, when I'd go to see her, but had
to search high and low to find her, as she was always walking all around
inside the building. It would sometimes take me 20 minutes to track her
down!
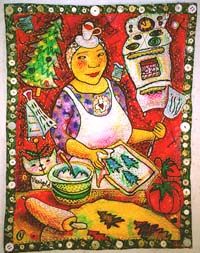 See how Mom translates into my art? Here's
what our "St. Quilta the Comforter's Christmas Cookies" looks
like all quilted and embellished. It's 30"h x 22.5"w. Colorado
Card will use it this next Christmas as a greeting card! I'm so relieved!
I really got carried away on the sewing on this thing, and got to worrying
about the possibility of them not accepting it! But they did!
Meantime, watch your card stores for our new greeting cards from coloradocard.com! They had a Valentine of ours, and soon will have six general greeting cards, all based on our art. The first three Kitchen Tarot cards will now be greeting cards! I'm so excited about this! If it works out well, I hope to start painting the card images on heavy paper, and maybe I'll get this deck of 78 tarot cards done in one lifetime, after all! If you call Colorado Card at 1-800-789-6221, they can tell you where the cards are sold nearest to you. And mention to them that you're looking specifically for our cards! Thanks a lot!
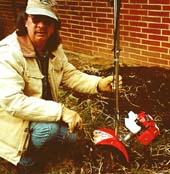 Because Jill Ruspi and my friend Pat Cornelius have
gone on and on about how wonderful their Mantis tillers are, we decided
to buy one early this month. It came March 2, and here's Jimmy, on a nice
warm day, March 4, putting the Mantis through its paces in a flowerbed!
Wow! That little thing really chews up the dirt, sod, dried weeds, whatever!
We named ours Hennie Pogo. Hennie to honor a friend's mom who had passed
away this year, and because of the Little Red Hen, who had to do all the
work. (Mom knew and identified with this story!) And Pogo, because it hops
around like a little pogo stick, and because Dad liked the alligator Pogo
in the funny papers.
After we dug around in four different places around the yard, we put Hennie Pogo away, and in a day or two it snowed and we had about 5" of snow for a few days! We maybe had the last of the cold snaps this last week, and can now get busy and dig up some serious gardens! After two years of using shovels and trowels to dig everything up, having kept the big garden heavily mulched to keep the dirt soft, we are going to have a big time with the Mantis. But we'll still use our lovely mulch, ala Ruth Stout's gardening methods. Mom believed in Ruth, and we do, too! Last we know of , Rodale reprinted her books in the 70s, but maybe they've been reissued again since then. Check 'em out. Mulching to 8" deep is a wonderfully easy way to garden without so much work!
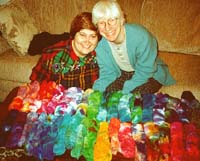 Maxine Seelenbinder-Apke was here for a mini workshop March 9
- 12. (We prorate our art camps at $100/day,
in case you'd like to take a Mini-Camp and can't do a full five days, but
we prefer having at least two students for this.) We dyed 36 pairs of sox
together. Worked like crazy on these! For me, it's the kind of project
I don't just pick up and do on a whim! It had been four years since the
last time I did sox! And I've been meaning to do it again for a long time,
but I need a good, harworking companion with me, and I need to know that
it's a person who's organized, since I can't stand a messy dye project!
Max was wonderful. We also worked a lot with airbrush, since Maxine had
just bought one for herself and her high school art students. She has been
in classes with us twice at Miami University's CraftSummer, but to operate
an airbrush on your own, you need more training than the little dab she'd
gotten from us in a very large group class.
By the time Max left here, she knew everything she'll need to, to keep the Aztek airbrush flowing! It was as concentrated as when we do full length Turtle Art Camps, since there was only one of her as a student. She and I each made a painting, side by side. Mine is St. Q Blesses Spring (to be stitched SOMEDAY!) and hers is a diary of our experiences during her camp.
Now we both have fancy new dyed socks to flaunt, and she's going to let her high school kids dye sox soon, too. If they work hard enough on their other projects first, that is! And my laundry room is back to being a laundry room, from being a dyeing room. Only I have some mixed up dyes left over, and keep thinking of what to do with them, so they don't spoil!.........
That's all, Folks! -Lucky (Susan)
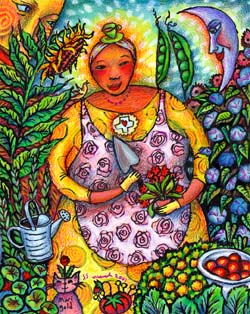 PS. Thought I'd leave you with this
image of a painting I did this month: "St. Quilta the Comforter Blesses
this Garden." It's 10"h x 8"w, painted and drawn on mat
board. It's my first really finished painting on paper in a very long time,
and I am planning on making a bunch of these, for possible cards and to
show. Amazing how much faster this goes than painting and embellishing
quilts. Yet, I love to do both.
So, here's St. Q's good vibes for starting your Spring garden digging! May you have no surprise frosts and may your plants grow well! May your connections to the Good Earth bring you much peace and well-being! And may the groundhogs go somewhere else!
I'll be back around May 21, with some early gardening stories to tell, as well as teaching adventures and art to show you.
Return to Page One of March 28 diary
Turtle Moon Studios
Susan Shie and James Acord
Contact us
| Home | | Classes
| | Gallery | | Green
Quilts | |Links |
| Resume | | Stuff
to Buy | |Turtle Trax Diary |
| Visit Jimmy's Leather Studio

![]()
Web site origianlly created by Susan Shie and Jan Cabral ©1997. Subsequent web site work © Susan Shie 1997 - 2005.
This page updated by Susan Shie, February 5, 2005.
Web site hosting by Key to the Web, Ltd. ©2005.